That maddening drip… drip… drip from under your kitchen sink isn't just an annoying sound. It's a clear signal that something is wrong, and figuring out the source of the problem is the first and most crucial step. A proper diagnosis is the key to successfully fixing a leaky kitchen sink drain, a common issue we see in homes and businesses all across Oxnard.
Finding the Source of Your Kitchen Sink Leak
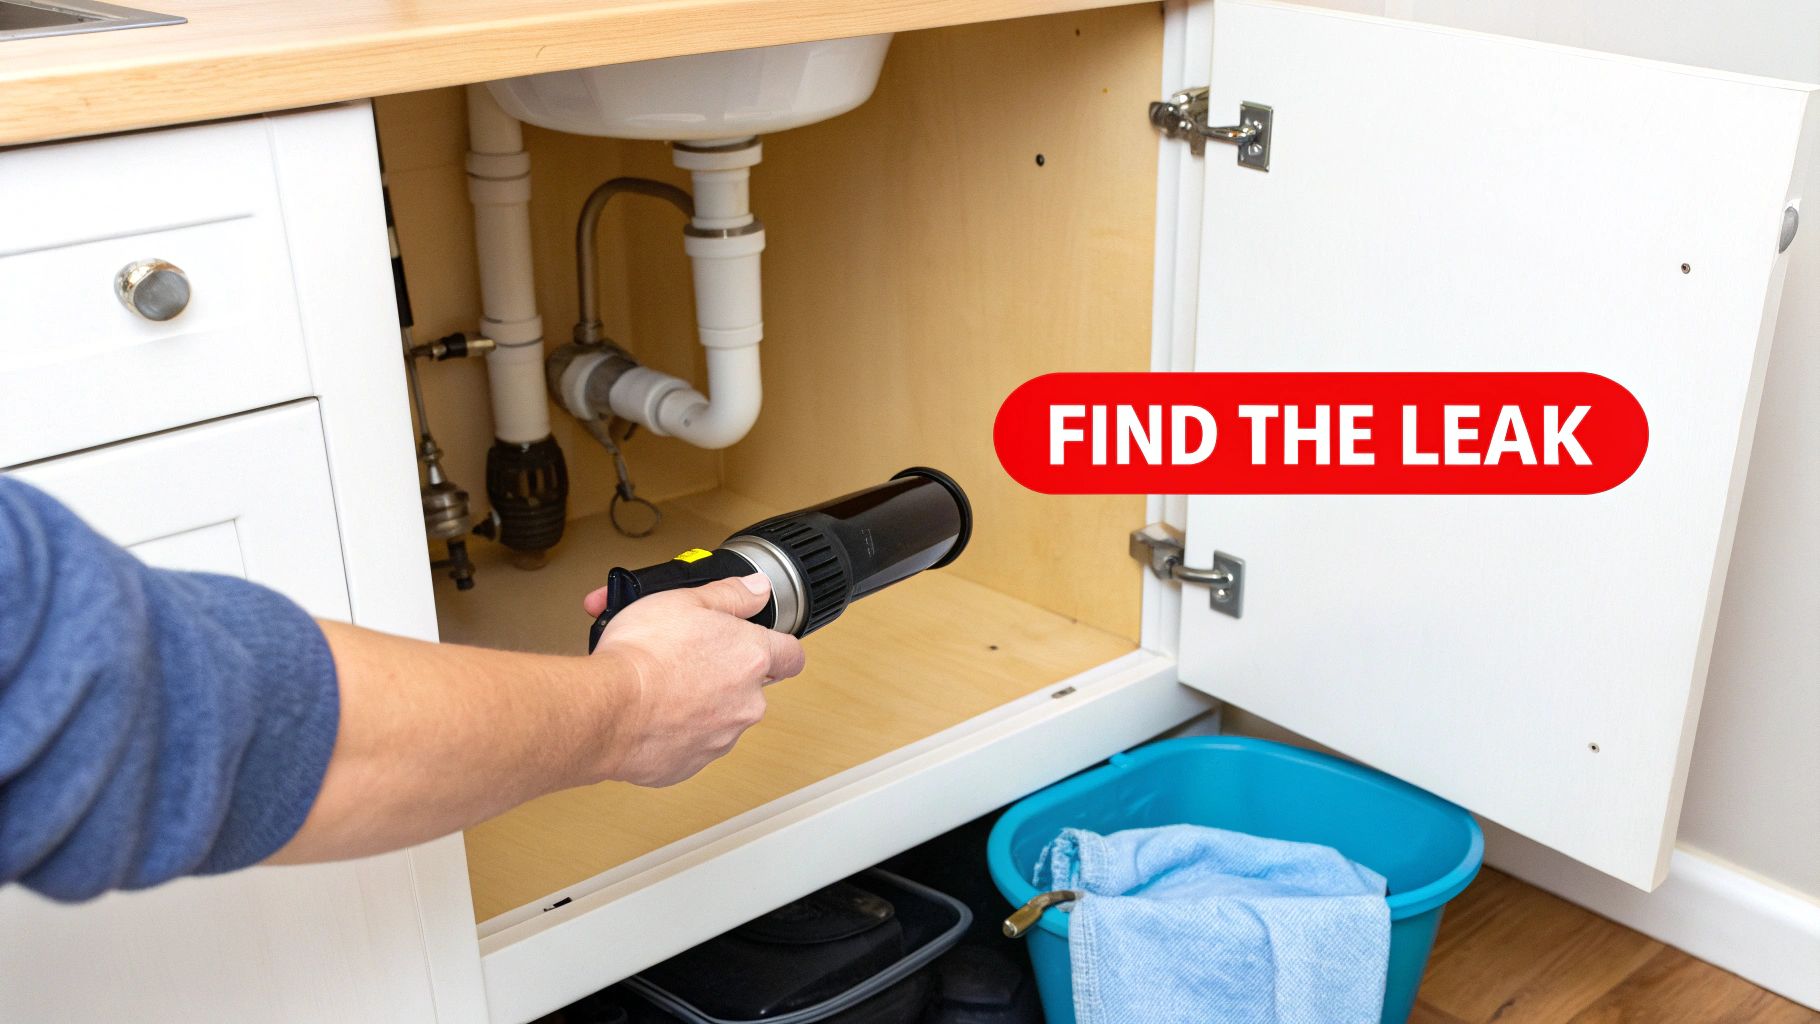
Before you reach for a wrench, you need to become a leak detective. The very first thing to do is completely clear out the cabinet under your sink. Remove all the cleaning supplies, soaps, and anything else stored in there. You need a clean, dry, and well-lit space to work. An empty bucket and a few old towels will be your best allies for this task.
With the area cleared, you can start a methodical search for the leak. Our professional advice at Armor Hydro Jetting is to always start at the top and carefully work your way down.
Inspecting Each Connection Point
Your first checkpoint is where the sink basin itself connects to the drain. This is called the sink strainer. Use a flashlight and look for any dampness, mineral deposits, or corrosion around the plumber's putty or the gasket.
From there, follow the pipe down to the slip nuts. These are the large plastic or metal rings that hold the different sections of the PVC drain pipe together. Run your hand over them. Are they tight? Do you feel any moisture?
A very common trouble spot is the U-shaped bend in the pipe, known as the P-trap. It has connections on both ends that can easily loosen over time and start to drip. Don't forget to check any connected appliances, either. Sometimes what looks like a sink leak is actually an issue with the garbage disposal. If that’s where the evidence leads, our guide to garbage disposal repair has some helpful information.
It’s tempting to ignore a tiny drip, but those drops add up faster than you'd think. A single, slow leak can waste thousands of gallons of water over a year, inflating your bills and risking serious, hidden water damage to your cabinets and floor.
That one small leak is part of a much bigger picture. The EPA reports that minor household leaks nationwide waste nearly 1 trillion gallons of water annually. It's a staggering number that shows why fixing even a tiny drip matters. You can learn more about this from the EPA's WaterSense program.
Your Toolkit for a Successful Sink Repair
Walking into a repair with the right gear is half the battle won. It’s what separates a quick, satisfying fix from a day-long headache. You don't need a professional plumber's entire van, just a handful of key items that will tackle the most common issues we see in Ventura County homes.
Getting everything together first saves you from those frustrating, greasy-handed trips to the hardware store right in the middle of the job. You'll thank yourself later.
Essential Tools and Materials
Before you begin, let's get your supplies in order. For most jobs dealing with a leaky kitchen sink drain, the basics will do just fine.
Here's a quick rundown of what you absolutely need to have within arm's reach:
- A bucket and old towels: This is non-negotiable. You're going to have some leftover water in that P-trap, and this combo will keep your cabinet base dry and clean.
- Channel-lock pliers: These are your best friend for this job. Their adjustable jaws are perfect for getting a solid grip on those large plastic or metal slip nuts without damaging them.
- A good flashlight or headlamp: It’s surprisingly dark under a sink. Good light is crucial for spotting the source of the leak and making sure your new connections are sealed tight.
You’ll almost certainly need some new slip-joint washers. These are the small rubber or plastic rings that create the actual seal inside the fittings. You can grab a pack from any local hardware store.
Pro Tip: Always take the old, leaky washers with you to the store. It’s the only way to guarantee you’re buying the exact size you need. Guessing is a recipe for another leak and another trip to the store.
To make this even easier, here's a simple checklist of what we keep handy for these kinds of repairs.
Essential Toolkit for Kitchen Sink Drain Repair
| Item Category | Specific Tool/Material | Primary Use |
|---|---|---|
| Cleanup & Prep | Bucket or small basin | To catch water when disassembling the P-trap. |
| Old towels or rags | For wiping up spills and drying components. | |
| Hand Tools | Channel-lock pliers (2) | For loosening and tightening large slip nuts. Having two helps. |
| Flashlight or headlamp | To illuminate the work area under the sink. | |
| Replacement Parts | Slip-joint washers (assorted) | To create a new, watertight seal in the drain fittings. |
| Plumber's putty or silicone | For sealing the sink flange if the leak is from the top. | |
| Safety Gear | Rubber gloves | To keep your hands clean and dry. |
| Safety glasses | To protect your eyes from unexpected drips or debris. |
Having these items ready transforms the task from a potential mess into a manageable project. While more serious issues might demand the kind of professional tools we use for complex pipe repair, this toolkit will see you through the vast majority of common under-sink drips.
Repairing Your Leaky Drain Step by Step
Alright, you’ve got your tools laid out and you know exactly where that drip is coming from. Now it's time to get to work. We're going to carefully take things apart, swap out the bad parts, and put it all back together so it's completely watertight. No confusing jargon here, just a straight-up guide for any Ventura County homeowner looking to get the job done.
The first move is to loosen the slip nuts on either side of the pipe section that’s giving you trouble. If it’s the P-trap, you'll be dealing with the two big nuts connecting the U-shaped pipe to the drain coming from the sink and the pipe going into the wall. Give them a gentle turn with your channel-lock pliers just to break the seal, then you should be able to spin them off by hand.
Once those nuts are loose, slide them out of the way and carefully pull the pipe section free. Make sure your bucket is right underneath, because this is when any water left in the trap is going to come out. Now you can get a good look at the old slip-joint washers.
Inspecting and Replacing Worn Parts
With the pipe off, take a close look at those little rubber or plastic washers. Nine times out of ten, they're the real culprits. Over the years, they get brittle, crack, or get squashed flat, losing their ability to create a tight seal. Even a tiny crack is all it takes to start a drip.
The fix is usually simple: just replace them. Take the old washer with you to a hardware store here in Oxnard to make sure you get a perfect match. We always recommend grabbing a few extras while you're there; they cost next to nothing and it’s a lifesaver to have them on hand for the future. Before you pop the new one on, take an old rag and clean the pipe threads and the inside of the fittings. Any gunk or residue can compromise the new seal.
A lot of the skills you're using here for a leaky drain are also handy for other kitchen plumbing headaches, like fixing a clogged dishwasher drain. Both jobs are all about careful disassembly and clean reassembly.
The Right Way to Reassemble
Now, slide the new washer onto the pipe. The key is to make sure the tapered side is facing the connection, as that’s the part that creates the seal. Fit the pipes back together and start tightening the slip nuts by hand until they feel snug.
This is a crucial point where many people go wrong. Don't grab the pliers right away! Over-tightening can easily crack the plastic fittings, turning a five-minute fix into a much bigger problem.
Once it's hand-tight, then you can use your pliers for a final quarter-turn. That little bit of extra torque is all you need to lock it in place without risking any damage. Of course, sometimes a leak points to a bigger issue, like a cracked pipe. For those tougher jobs, calling a professional like Armor Hydro Jetting for pipe repair is your best bet for a reliable, long-term fix.
The infographic below shows you the simple but essential toolkit for this job.
As you can see, with just a bucket, a pair of pliers, and the right replacement washers, you’re ready to tackle most common sink drain leaks.
Testing Your Work and When to Call a Pro
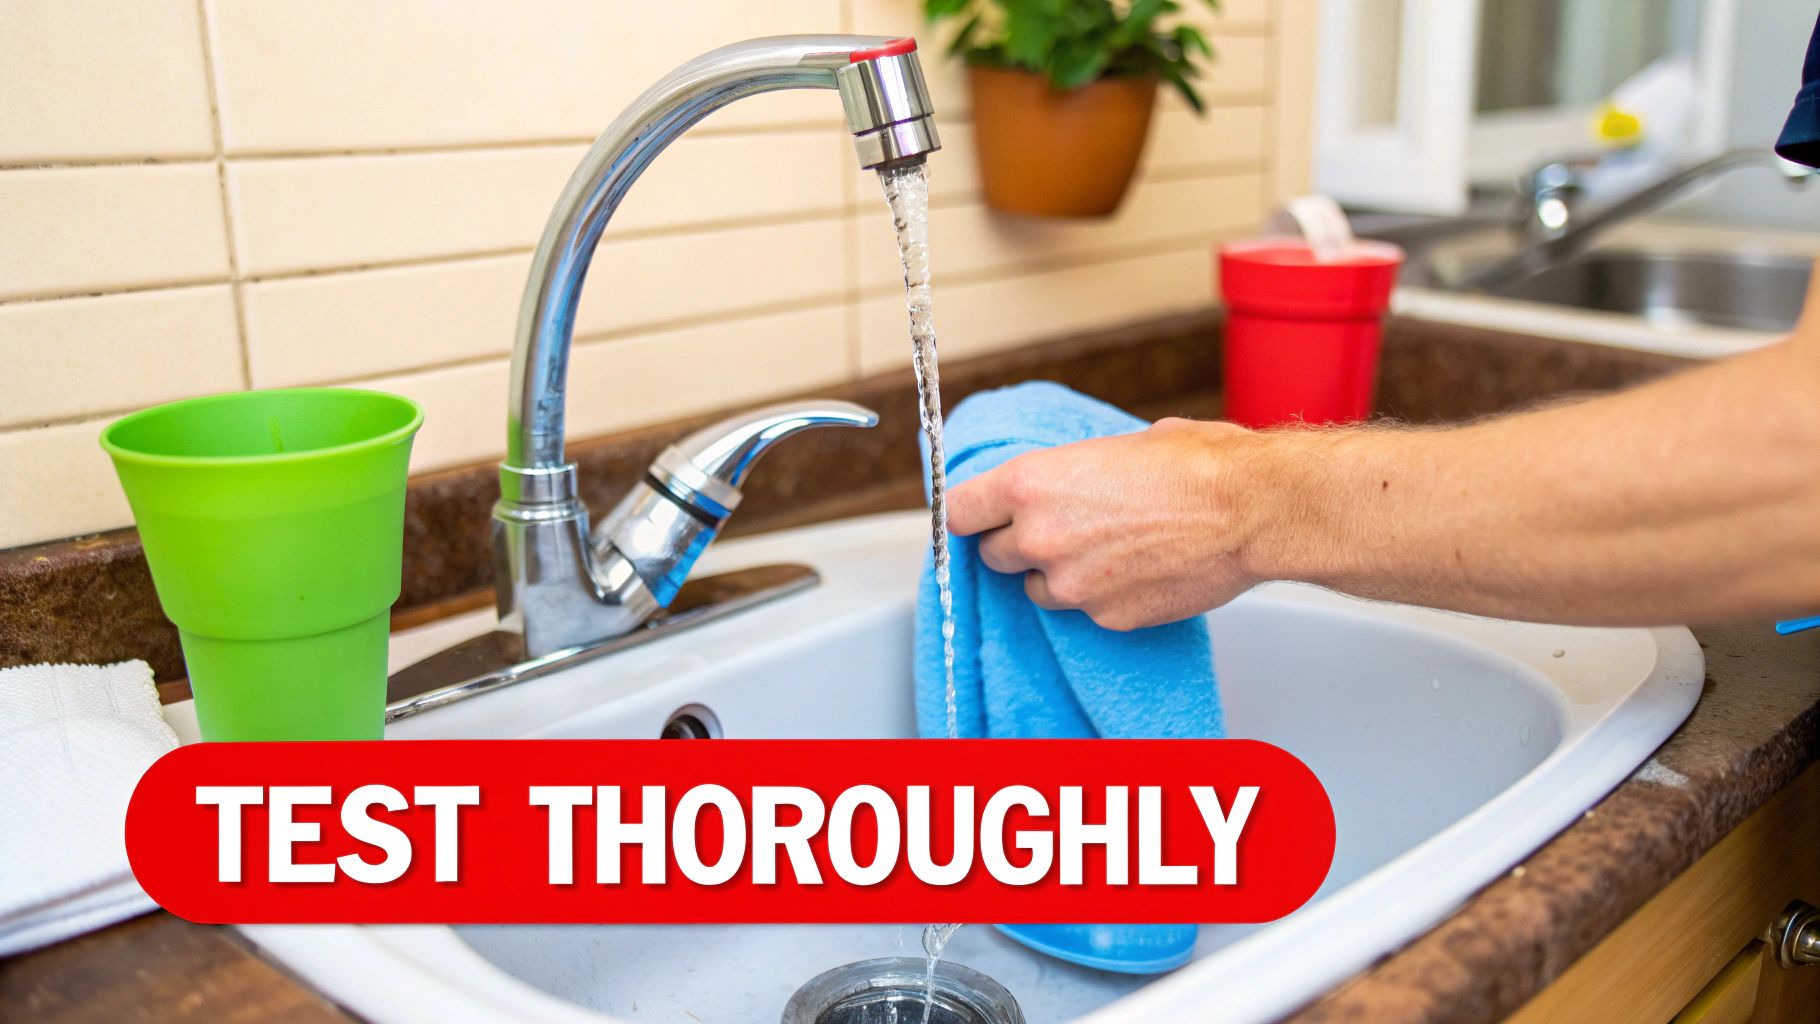
You’ve got that final nut tightened, and it feels like the job is done. But don't pack up your tools just yet. The single most important part is making sure your repair is actually going to hold. A slow, sneaky drip can cause just as much water damage over time as a major gusher, so a proper test is non-negotiable for homeowners everywhere.
Before you turn on the faucet, lay a dry paper towel or a piece of cardboard directly under the drain assembly you just worked on. This little trick is our go-to because it makes even the tiniest drop of water instantly visible.
Now, let the cold water run for a solid minute or two. Get your eyes right on the connections and watch closely for any signs of moisture.
Putting Your Repair to the Test
So far, so good? Great. Now it’s time for the hot water. This step is crucial because plumbing parts, especially plastic ones, can expand with heat. A connection that seems perfectly fine with cold water might reveal a tiny leak once things heat up. Run the hot water for another minute and give that paper towel another inspection.
Next, we simulate a real-world stress test. Plug the sink and fill it about halfway with water. Then, pull the stopper. That sudden rush of water puts maximum pressure on the drain seals and gaskets. It's the ultimate confirmation that your repair is solid. If that paper towel is still bone dry after all that, you can finally call it a job well done.
A successful repair isn't just about stopping the current drip; it's about setting yourself up for a healthy plumbing system down the road. Simple maintenance habits can prevent many future headaches.
To keep your drains flowing freely, make it a rule to never pour grease or toss coffee grounds down the sink. They are the leading causes of nasty clogs. And please, steer clear of those harsh chemical drain cleaners. They can eat away at the rubber gaskets and plastic components in your pipes, creating the very leaks you're trying to avoid.
Spotting a Bigger Problem
We're all for rolling up your sleeves and tackling a home repair project. But there comes a point where you need to know when to call in the pros. Making that call can be the difference between a quick fix and a full-blown, wallet-draining disaster.
If you’ve swapped out the washers, tightened all the fittings, and that drip just won’t stop, it's a classic sign that the problem runs deeper than a worn-out part. You might be looking at a hairline crack in the pipe, a fitting that's warped, or an issue lurking further down the drain line. These kinds of complicated repairs can bring surprising costs, as you can learn from this breakdown of pipe repair costs on Angi.com.
If a leak turns urgent, our crew at Armor Hydro Jetting is always on standby for fast emergency plumbing services. We handle complex pipe repair and even use high-powered hydro jetting to clear out stubborn clogs that put constant stress on your drain system. And if your to-do list has grown beyond just plumbing, you can find help for all sorts of general maintenance repairs when the job gets too big to handle on your own.
Still Wondering About That Drippy Sink?
Even after you've tightened everything up and the leak seems to be gone, you might have a few questions. As a plumber serving Ventura County, we hear a lot of the same concerns, so let's tackle the big ones right now.
"Why Does This Same Spot Keep Leaking?"
If you feel like you're constantly fixing a leak in the exact same spot, you're not just imagining it. This usually means there's a deeper problem than a simple loose connection.
More often than not, it's one of a few culprits:
- The plastic threads on a slip nut might be cross-threaded, meaning they never create a perfect seal. It's surprisingly easy to do if you're not careful.
- Older PVC pipes can warp over time, losing their perfectly round shape and preventing a good seal.
- A powerful garbage disposal can cause just enough vibration to slowly loosen connections, no matter how tight you make them.
In these situations, just swapping out a gasket won't be a long-term fix. You have to address what's causing the joint to fail in the first place. Another question we get all the time is about chemical drain cleaners. Our advice? Stay away from them. Those harsh chemicals are brutal on the rubber gaskets and plastic components under your sink, making them brittle and causing them to fail way sooner than they should.
The smartest way to handle plumbing is to get ahead of problems. It's always cheaper to prevent a major issue than to clean up after one.
It’s no surprise that the leak detection and repair market is growing so fast. It’s valued at over $21 billion! People are realizing that fixing small drips saves a lot of money and water in the long run. You can dig into more of the data on this growing market on ArchiveMarketResearch.com.
Sometimes a DIY project doesn't go as planned, or you'd rather have an expert handle it right the first time. If you want that leak gone for good, Armor Hydro Jetting has your back. For any plumbing headaches in Ventura County, from expert drain cleaning and water heater repair to emergency services, visit us online and we'll get you scheduled.